Linksys E1000
From DD-WRT Wiki
Please see this thread for information on E1000 and dd-wrt compatibility http://www.dd-wrt.com/phpBB2/viewtopic.php?t=79673
Contents |
Install Procedure
WARNING: This is only for version 1 hardware. For version 2: Linksys_E1000_v2.0
- Read the Peacock Announcement.
- Download a trailed mini build (with mini_e1000.bin in the name) from the broadcom_K26 folder.
- If you wish to experiment with a newer build, read its New Build thread before flashing a newer build
- Set a static IP on your computer e.g. 192.168.1.7 and subnet mask 255.255.255.0
- Connect an ethernet cable from your computer to a router LAN port. Do NOT use wireless!
- Recommended to disconnect other cables.
- Perform a hard reset.
- Navigate to http://192.168.1.1/ for the Linksys web GUI
- Go to the Linksys Administration->Firmware Upgrade page. Do not give the reboot command. You will use this page to upgrade your firmware.
- Browse to the downloaded firmware and click Upload.
- Do not touch anything. The page will tell you that the upgrade was successful and the router is now rebooting. Your router may take upwards of a couple minutes to reboot. Watch the lights... once the wireless and power indicators are on steadily for several seconds, your router is fully rebooted and you can click "Continue" in your browser window.
- If the DD-WRT password change page displays, your upgrade has been successful, and you must now perform another hard reset. This time, when you navigate to http://192.168.1.1/, click "Reboot" and wait for the router to come online again so you can configure it.
- Make sure all builds you flash are less than 8 000 000 bytes in size or you will brick the router.
If the DD-WRT password change page does not display, your page request times out, or you can't ping 192.168.1.1, make sure both wireless and power lights are on steadily first, then do a hard power cycle (unplug the power from the router--do not do a 30/30/30 reset). Wait a few seconds and plug the power back into the router. Wait until both wireless and power lights are on steadily, then navigate to http://192.168.1.1/ in your browser of choice again. If the DD-WRT password change page displays, your upgrade has been successful, and you must now perform another hard 30/30/30. This time, when you navigate to 192.168.1.1, click "Reboot" and wait for the router to come online again so you can configure it.
You can also flash the same firmware of TomatoUSB as described for WRT160N_v3.0
Firmware version 33555 dated 10/20/17 runs on this router, but doesn't have the final Broadcom fix for the KRACK vulnerability in WPA2. KRACK fixes for Broadcom were completed in SVN 33678, but build 33679 is missing many files, so it is recommended to use 33772 or newer, after reviewing New Build threads.
See Where do I download firmware? for build links.
Performing a Hard Reset
Procedure for an E1000v1:
- Perform a normal 30/30/30 reset.
- Login to http://192.168.1.1/ and you will see the Linksys - Management Mode page.
- Click "Reboot."
- In a moment, you will see "Command reboot completed." The router will now start the reboot process. When the lights return to their normal state, you can click "Continue" to be taken to the router's main page.
Serial Recovery
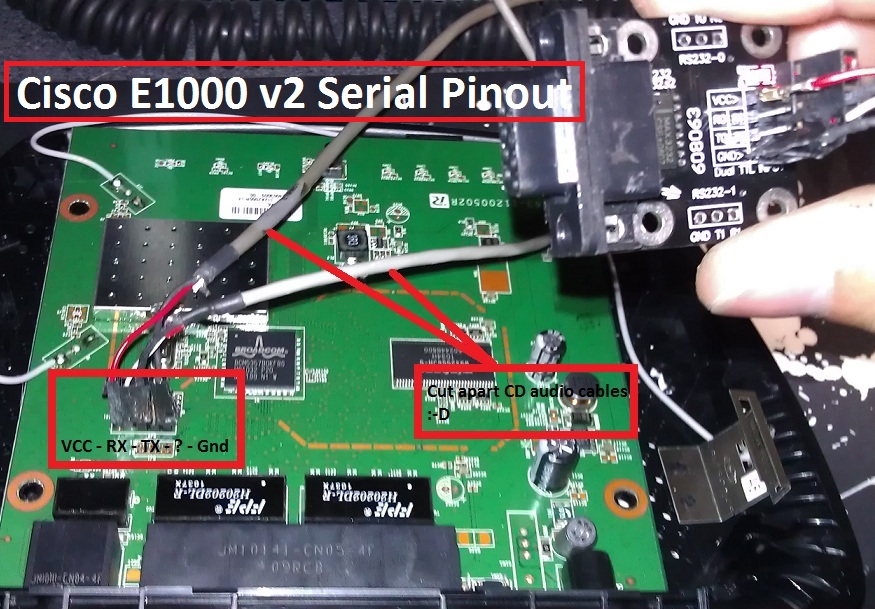
I had an awfully difficult time doing serial recovery on this router. It was my first time so you can imagine that I had no idea what I was doing. There are some slight deviations from the standard serial recovery procedure that is in the Wiki so I decided it would be a good idea to add the information here. First of all, the pinout is the same as the E2000 (at least for the E1000 v2).
You should familiarize yourself with the Serial Recovery article before trying this, I'm not going to explain everything again here.
Looking from the back of the router you should see the 2x6 JTAG port and above that 5 holes. These 5 holes are the serial port. Again, looking from the back of the router: VCC - RX - TX - ? - Gnd
Once at the prompt you need to assign an IP/Subnet mask to eth0. I'm not sure if eth0 is the routers interface to the switch or one specific port but I had a CAT5 cable hooked up to port 1 on the router and it worked.
If you type "ifconfig eth0" you will see that there is no address assigned to the interface. The following command will assign an address/mask.
CFE> ifconfig eth0 addr=192.168.1.1 mask=255.255.255.0
Now you can flash using a TFTP client from your computer, which is plugged in to port 1 on the router, just like the Serial Recovery page says.
JTAG!
Barryware, using a mixture of perseverance and brilliance, has found a way to fix the fact that Linksys, in for completely baffling reasons, did not connect the jtag port to the processor. This isn't for the faint of solder, but there IS now a way to jtag the 160nV3 and the E1000_V1! See this: http://www.dd-wrt.com/phpBB2/viewtopic.php?t=146077
flash -ctheader : flash1.trx
